A number of users, including myself, have been disabling the Asus ROG Ally CPU Boost and have noticed it helps lower temperatures and prolongs battery life. However, there’s also a catch that could do more harm than good, depending on what you play or use the device for.
By default, Asus has enabled CPU boost on the ROG Ally, allowing the CPU to run at a higher clock speed. The AMD Z1 Extreme CPU has a base clock speed of 3.3 GHz, but can boost that clock speed up to 5.1 GHz. Normally, having the ability to boost the CPU clock is a good thing. However, when it comes to a mobile device, the higher clock speeds come with more heat and power being used up.
When I disabled the CPU boost, I noticed that my ROG Ally enjoyed a better overall temperature, and I didn’t use up as much battery using any of the presets.
That said, I want to stress that disabling the CPU Boost doesn’t mean that the ROG Ally will automatically turn into the best handheld gaming PC. Disabling this feature drops the CPU clock speed, and some games need higher clock speeds, so this could also hamper your performance.
While I haven’t encountered any issues with the games I play. However, several emulators have suffered as they require higher clock speeds to work correctly. This will be a trial-and-error sort of thing, and it makes you wonder why Asus didn’t give us the ability to disable or reenable the CPU Boost in the Command Center.
Before you proceed with this, I highly recommend you have a keyboard and mouse connected and possibly a dock to connect it to a monitor or TV. You don’t want to mess anything up.
- Open up the Windows Registry Editor with administrative permissions. You can do this by typing “regedit” in the Windows search, which will bring up the Registry Editor. Then choose the “Run as Administrator” option.
- In the Reg Editor, I would make a backup. Any time you make any changes, it’s good to make a backup first. To do this, go to “File -> Export” and then give the backup a name and save it.
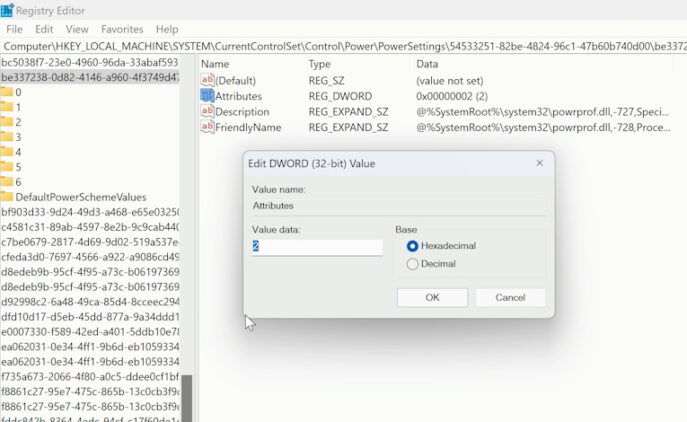
- Once that’s done, go back to the Registry Editor and click on “Edit -> Find” and enter text into the field (minus the quotes) “Computer\HKEY_LOCAL_MACHINE\SYSTEM\CurrentControlSet\Control\Power\PowerSettings\54533251-82be-4824-96c1-47b60b740d00\be337238-0d82-4146-a960-4f3749d470c7”.
- This will take you to the power settings for Windows. There, right-click on “Attributes” choose “modify,” and change the Value Data from 1 to 2.
- Save the changes by going back to “File -> Exit.”
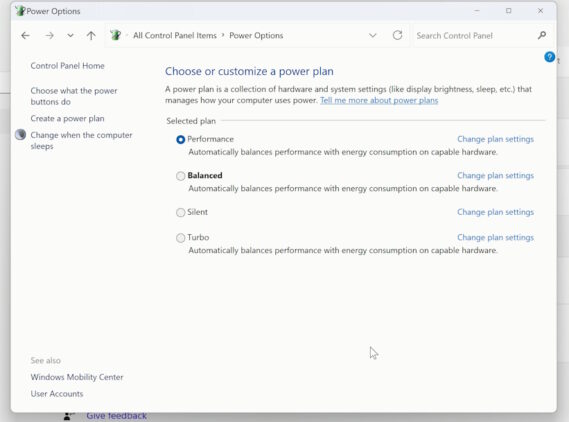
With this done, you can go to the Windows Control Panel by typing “Control Panel” in the Windows Search bar and selecting Control Panel. Once in the Control Panel, head to the Power Options. You’ll see multiple power plans; Performance, Balancer, Silent, and Turbo.
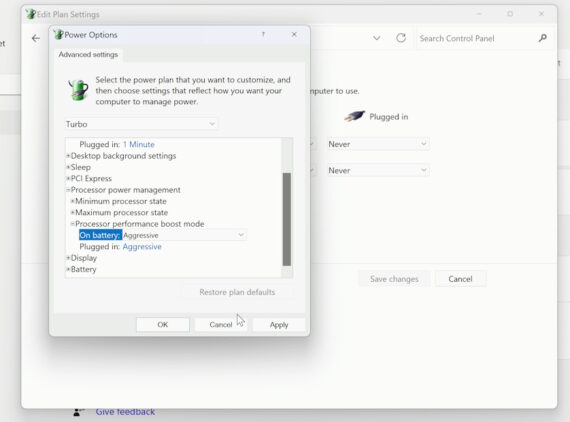
You will want to “Change Plan Settings” for each of these power plans to make changes. In this instance, I will be making a change to the “Turbo” power plan.
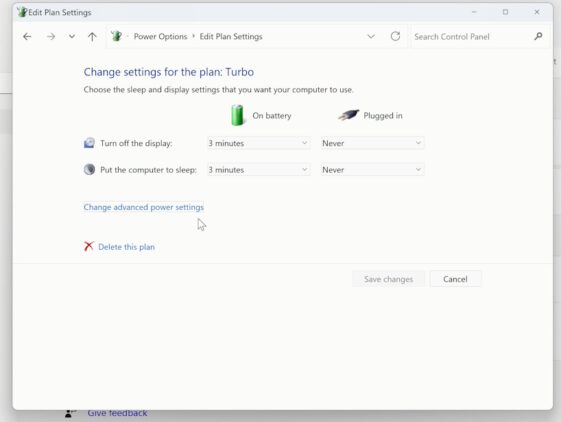
- Click the Turbo power plan.
- Once in the settings, go to “Change advanced power settings.”
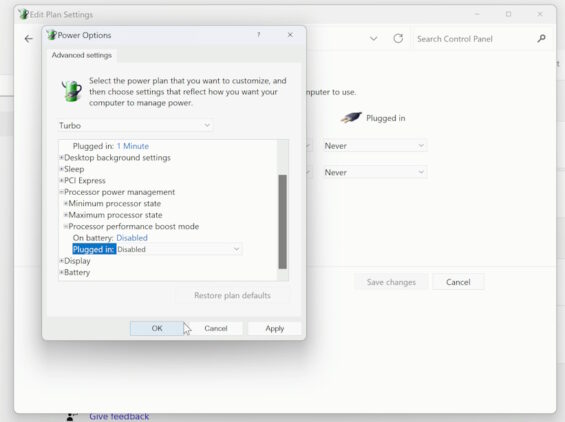
- Here, you’ll see “Processor Power Management. Expand it to show Processor performance boost mode. There are two settings you’ll need to change; On battery and Plugged in. Both are set to aggressive, and you’ll want to change this to disable it, then click “Apply.” You’ll have to do this for each power plan as well.
Once this is done, you’ll have effectivity disabled CPU Boost on the Asus ROG Ally. Of course, if you notice that you are experiencing issues with running games, you’ll need to come back and set disabled to enabled or aggressive.
If you found this guide helpful, be sure to check out our other Asus ROG Ally guides.


